Sealed system thermodynamics is a deep well, but fortunately, you only need to skim the surface to gain a functional understanding. And as techs, it’s this functional understanding that we need to acquire in order to effectively troubleshoot.
To do that, we’re going to cover the three central concepts to understanding a sealed system: saturation, subcooling, and superheat. Let’s start with the one upon which the other two hinge: saturation.
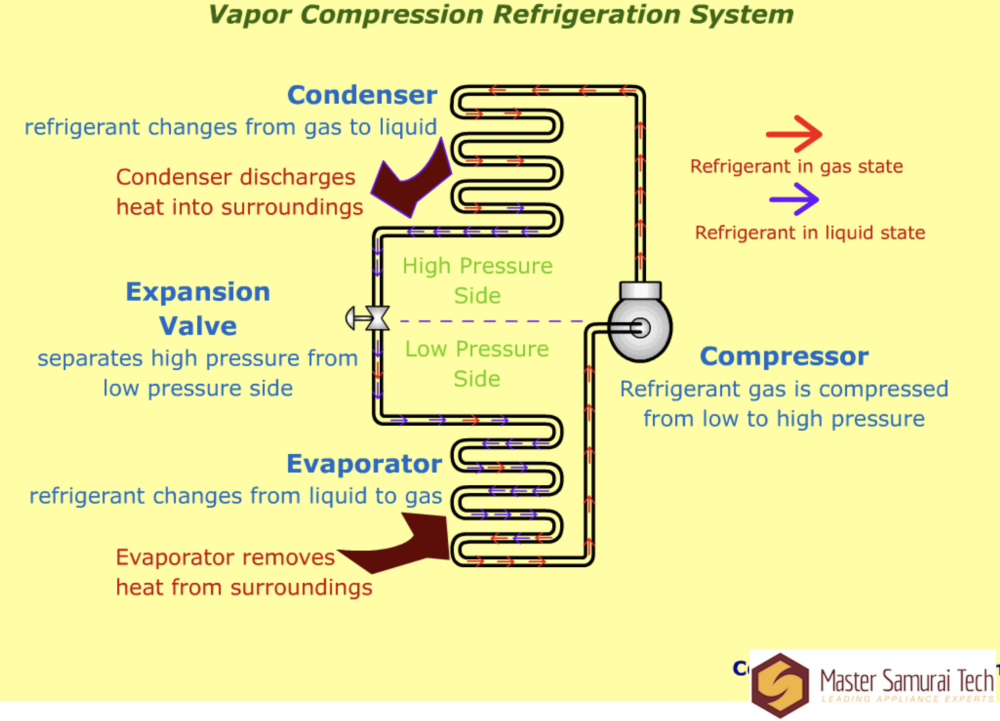
In order to talk about what saturation is, we first need to have a clear image of a sealed system. Here’s a very simple diagram that shows the refrigerant moving through the system and changing state.

Basic things to note here: the compressor and the expansion valve/capillary tube (both serve the same function) divide the sealed system into two different pressure zones: low and high.
Each of those pressure zones has a coil of tubing in it — the condenser in the high side, and the evaporator in the low side. It’s within either of these coils that refrigerant changes state. In the evaporator, the refrigerant changes state from a liquid to a gas (boils), absorbing heat from its surroundings. In the condenser, the refrigerant changes state from a gas to a liquid (condenses), releasing heat into its surroundings.
State changes happen at saturation temperature. In casual language, we would say that saturation is the boiling point. See, saturation is a concept that applies to any kind of matter that exists in liquid and gas forms. For example, the saturation temperature of water at sea level is 212 F. That’s when it boils.
Sounds simple enough. But we don’t use water in our sealed systems, and not everything boils at 212 F. The saturation temperature depends on both the substance in question and its current pressure.
That bit about pressure is key for refrigeration. The saturation temperature of a substance increases as its pressure increases, and decreases as its pressure decreases. To use water as an example again: if you went to boil water on the top of Mt. Everest, where the air is much thinner and therefore the atmospheric pressure much lower, you would find it boiling at around 154 F. Lower pressure = lower saturation temperature.
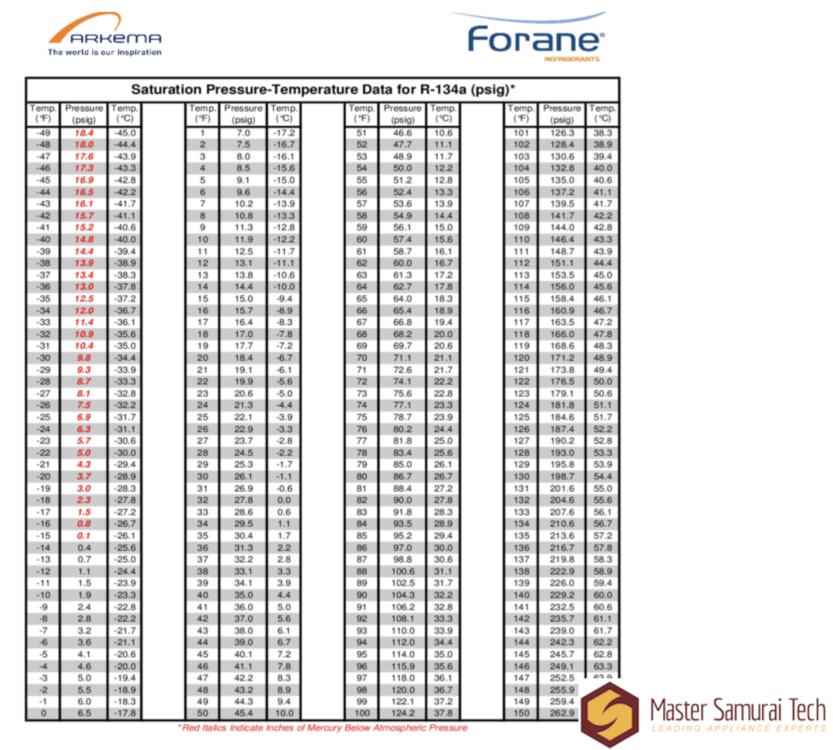
To return to refrigerants, here’s a chart that shows how the saturation temperature for the refrigerant R134a changes with pressure:

One last important thing about saturation that brings it all together: a substance absorbs heat energy in order to change state, but this does not increase its temperature. This is more intuitive than it sounds if you again think of boiling water. The burner is still on underneath the pot, but the water doesn’t get any hotter than 212 F. Instead, all the heat from that burner that enters the water is fueling the phase change from liquid to gas. In other words, it takes energy to fuel the phase change, but that heat isn’t felt in temperature. We call this latent heat.
This is the big trick of refrigeration: by lowering a substance’s pressure, you can make it boil to absorb heat from one area without getting hotter itself, then move it to another area under higher pressure and let it release that heat, changing state back to a liquid. You can see on the above chart why R134a is a good refrigerant: at low pressures, it will boil at very cold temperatures.
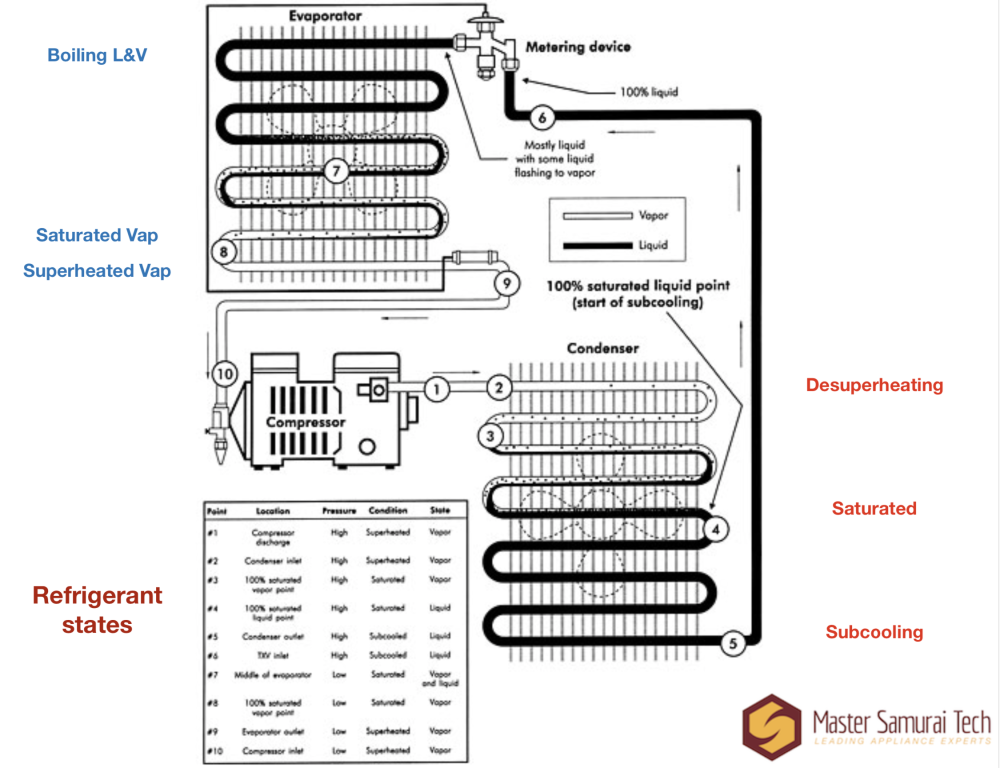
Got all that? Good. Now we can look at a slightly less simplistic diagram of a sealed system that will also introduce us to our next two terms: superheat and subcooling.

Now we get to see not only the state of the refrigerant (liquid or vapor), but we can see where in the system is at saturation vs. where it’s superheated and subcooled.
Now that you understand what saturation means, it’s relatively easy to explain superheat and subcooling. They just refer to a substance being hotter or colder than the saturation temperature.
Importantly, this does not mean that a superheated substance is necessarily “super hot”, or a subcooled one “super cold”. For example, if we look at that R134a chart, we see that it boils at around -15 F at 0 psig (atmospheric pressure). This means that R134a at atmospheric pressure that was -5 F would be considered superheated — not “super hot” at all! Similarly, at that same pressure, R134a at -20 F would be considered subcooled.
As long as you know the pressure of a refrigerant, you know what its saturation temperature is. You can then use that, a temperature measurement, and some basic arithmetic to determine how many degrees of superheat/subcooling the refrigerant has at that point in the system. To use our two examples from the previous paragraph, R134a at 0 psig and -5 F has 10 degrees of superheat, and the same refrigerant at the same pressure but at -20 F has 5 degrees of subcooling.
These concepts of saturation, superheat, and subcooling are the foundation of all sealed system troubleshooting. By applying this knowledge along with clever, non-invasive temperature and amp measurements, you can troubleshoot almost any sealed system problem.
Want to learn how to apply your newfound sealed system knowledge to real-world troubleshooting? Click below to check out the Advanced Refrigerator Repair course right here at the Master Samurai Tech Academy.